Drywall Soundproofing – The Complete Guide
As a homeowner, there are many reasons why you may want to make your walls soundproof. If you wish to keep out external sounds from your home or minimize the noise coming from the next room, you can create a drywall sound barrier. This is where drywall soundproofing comes in.
Why Install Soundproof Drywall?
Soundproof drywall barriers help you to contain the sound inside your room, allowing you to maintain a high level of privacy. Keep in mind that sounds can easily go through standard drywall. That means it’s crucial for you to install a soundproof drywall barrier if you want to control the sound. This is why drywall soundproofing is important.
Though there are various ways of creating soundproof barriers, installing special soundproof drywall is the best way to go about it. These useful noise mitigation products are easy to install over walls, without necessarily having to demolish them. They don’t necessarily require specialized skills and you can use them even without the knowledge of how they work. However, we will explain this below.
How Does Soundproof Drywall Work?
Before looking at how they work, it’s worth mentioning that soundproof drywalls are more effective than multiple layers of standard drywall. These products are made of several layers of gypsum and other materials, depending on their expected level of performance. They are also wrapped in thick liners of paper or rubber, to create a mass of drywall panels. The materials used work very well in creating a barrier to block noise through your wall surfaces.
Soundproof drywall panels quickly dissipate sound when hit, minimizing noise from the echo and re-vibration. They also help to keep out other noises, but the results also depend on other materials used to create the wall. However, soundproof drywall is your best option if sound leakage is your biggest concern. The installation process is also simple, but you may need a handyman if you’re not up to the task.
How to Install Soundproofing Drywall
Soundproof drywalls can be installed to replace ordinary drywalls and kill noise. The installation process may take some time, but it’s generally very simple.

Here is a step-by-step guide on how to install them:
- Before starting the installation process, you should check for any holes or cracks in your wall and close them. That’s because any space on the wall can allow a certain amount of sound to go through to the next room.
- You may need to install soundproof insulation such as this OWENS Acoustic Insulation to create a little more distance between your wall and the external noise. The insulation will also help you to close any cracks or openings in the wall. Remember that the walls need to be as airtight as possible, for maximum results.
- Use a standard drywall knife such as this Drywall Axe All-in-one Utility Knife to cut the soundproof panels into functional pieces while installing. The boards are easy to cut,and you can install them the same way as ordinary drywall.
- Using regular drywall screws, attach the soundproof drywall panels directly to the studs. You can use threaded screws to install the panels on walls with wooden studs or finescrews for walls with metal studs.
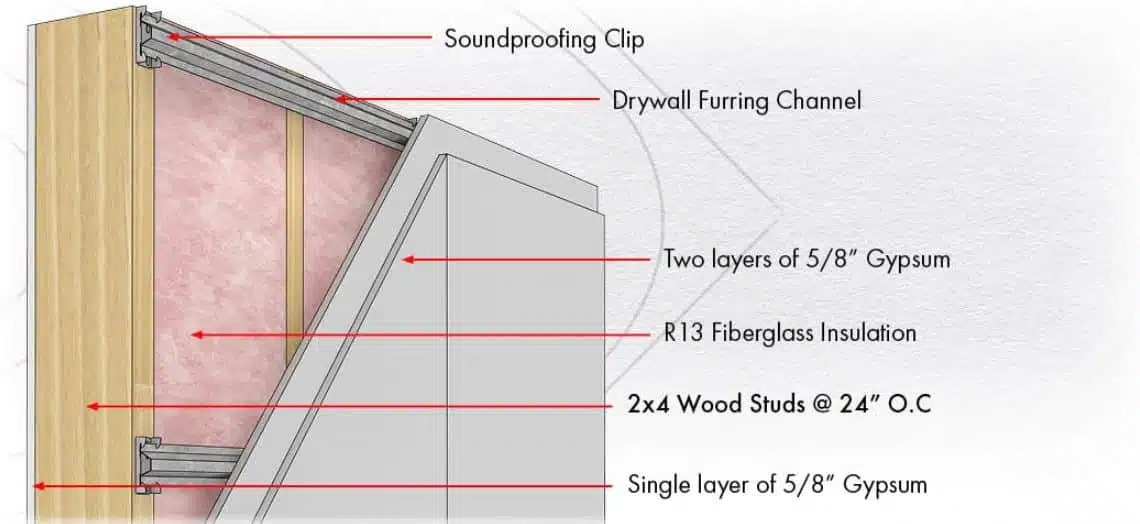
- Optionally, you can use resilient channels to maximize the soundproofing results. Resilient channels are metallic structures attached to the wall studs, before attaching the soundproof drywall on top of them.
- After installing the soundproof drywall, you will need to check for any gaps or cracks in the wall and seal them using soundproof glue. It’s essential to cover the entire perimeter of your wall, to ensure that only a minimum amount of sound can go through.
- You should check all the electrical cutouts on your wall and seal them. That means you have to seal switches and power outlets, to minimize unwanted sound leakage in your room.
- After installing the soundproof drywall, you are free to tape, mud or paint your room and start enjoying the experience.
Drywall Soundproofing Options
Though there are only a few soundproofing drywall products on the market, you can easily find something that will work for your walls. These brands include:
1. Quiet rock
Quiet rock is a high-class product that is not only soundproof but also fire resistant. It is made with lower quantities of materials, allowing them to take less space than other products. The best part is that they are very good at limiting the sound in your room and you don’t need any special tools to install them.
2. Quiet coat
If you don’t want to replace your wall with the soundproof drywall, quietcoat is just the thing for you. This product is available in paint-form,and it helps you to reduce the noise comingfrom your appliances. You can apply them to various surfaces, but they are most suitable for rooms with electrical devices like computers, air-conditioning units, and others.
3. Quiet wood
As the name suggests, this soundproofing product is made of wood and is effective at controlling noise. The panels have an internal reinforcement of different soundproofing materials,and you can use them instead of conventional plywood products.
Besides these products, you can find several other soundproofing drywall options on the market. Keep in mind that these products may cost little more than ordinary drywall products, but they are worth it if you really want to reduce noise.
Drywall Soundproofing Cost
So with all this talk about drywall soundproofing, you may be wondering – ‘how much does all this cost?’ Well, that depends on a few things, including the type of drywall soundproofing material you choose and where you go to purchase.
For example, you can get QuietRock #510 for just over $50 per 1/2″ thick, 4′ x 8′ panel at Lowe’s.
Let’s say that’s too expensive for you and you decide to use conventional, thick drywall. In this case, you are looking at about $10 – $15 for 1/2″ thick drywall.
This means you can purchase 5 times as much thick drywall for the same cost as QuietRock #510. However, when you consider the advantages of a drywall soundproofing material such as QuietRock, then you’ll see it’s the better choice. Why? This is simply because it allows you to easily pack in greater sound absorption in a smaller size. Moreover, multiple layers of drywall is just not very practical.
So, Why Not Install Multiple Layers of Drywall?
Theoretically, you can replace soundproof drywalls with about eight layers of regular drywall products, to achieve the same effect. While this can be done, it is not the best solution. Moreover, there are also several other limitations:
- Several layers of drywall increase the weight of your walls, and it may be too much for your house to handle.
- They result in additional labor costs. That will mainly happen if you choose to hire a handyman to help you with the installation.
- It reduces floor space.
- It’s impossible to install multiple layers of drywall if you already have a ceiling in your room.
- If you install multiple layers of drywall, you will need to increase the installation materials used. That includes tapes, insulation glue, joining screws and others.
Bottom Line:
Though there are many noise mitigation strategies out there, soundproofing drywalls is an excellent option. These unique sound damping products look similar to ordinary drywalls but are quite useful in reducing unwanted noise leaks. They are readily available on the market and make it easy for you to improve the privacy and comfort of your home or office.
The post Drywall Soundproofing – The Complete Guide appeared first on Boom Speaker.
https://ift.tt/2GzcVlR
No comments:
Post a Comment